Bringing Early Photography Into the Modern Era
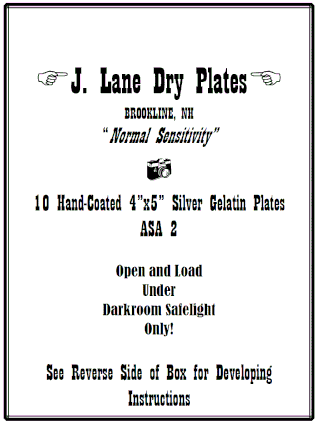
J. Lane Dry Plates resurrect the look of early 1880s un-sensitized silver gelatin emulsions. If you wanted to pin down a year, these are what you'd expect in high quality plates in 1881. The dry plate era was a critical time in the development and mass marketing of photographic negatives, and many of the world’s first amateur photographers took their first photographs on dry plates very similar to ours. With the advent of sensitized emulsions (orthochromatic, panchromatic) and other advances in emulsion engineering, the original silver gelatin emulsions were lost to time and no longer produced by anyone until today.
J. Lane Speed Plates bring to you a further 15 years of development, spanning the time when Eder built on the work of Vogel to introduce the red dye erythrosine in 1884 to create sensitive Orthochromatic emulsions. The advancement of photography by amateurs gave way to funded research as chemists and enthusiasts moved into the research labs of commercial manufacturers. Stiff competition to corner the exploding amateur photography market curtailed the sharing of information about new developments. However, key publications and texts of that period preserved the advances that were made behind closed doors. Leveraging that information, we are able to offer you an Orthochromatic dry plate which captures the wonder of photography at the turn of the 20th Century.
Photographers of the 1880s and 1890s had very little technical information to go on from the manufacturers. They had nothing comparable to the datasheets of modern film. Instead, they relied on their own experience and willingness to learn by doing. They learned by shooting the dry plates and gaining an understanding of how they worked in the lighting and conditions that they shot in. They were familiar with nuances which we don't worry about today. Nuances like how the response of the plates varied with the seasons, latitude, and time of day. You don't worry about this with the refinement of modern film, but those nuances are preserved in the emulsions of our dry plates. The more you shoot these dry plates, the more you will become aware of the interplay between the emulsion and your environment. Learning to successfully shooting dry plates *will* strengthen your photography on a fundamentally intuitive level.
While I encourage you to learn by experiment as I have, I also understand the wise saying "Waste not, want not." Amateur photographers of the era shared the results of their experimentation, problem-solving, and successes with enthusiasm in photographic journals of the period. These original journals can be found preserved on the internet, and reading them can sometimes be very similar to reading posts on social media.
In the spirit of our enthusiastic predecessors' willingness to share results, this page provides information on the dry plates themselves as well as information you will find useful in getting started successfully shooting the dry plates. You can take advantage of this hard-earned experience so you can focus on capturing your photographic creativity on this wonderful media from a by-gone era.
|
J. Lane Dry Plates Hand-Coated ASA 2 Glass Plate Negatives These dry plates provide the same results as dry plates of the late 1870s and early 1880s. These plates are coated with an ultra fine-grain emulsion sensitive only to UV and blue. Contrast is moderate for printing with modern papers, and the long toe preserves shadow details for scanning. As with other primitive processes, the effective speed of the plate will vary depending on actual UV levels. The emulsion has been designed to meter at ASA 2 under early spring northward lighting at moderate latitudes, but expect actual speed to vary by up to a stop or more. |
|
|
J. Lane SPEED Plates Hand-Coated Orthochromatic ASA 25 Glass Plate Negatives
These dry plates are formulated to provide the same results as dry plates of the late 1890s. These plates are coated with an ultra fine-grain, high contrast orthochromatic emulsion with response from UV through the visible spectrum up to 610 nm. The high contrast is excellent for alternative process printing or for printing onto multigrade paper at grade 0. The long toe of the characteristic curve preserves shadow details for scanning. As with other primitive processes, the effective speed of the plate will vary depending on actual UV levels. The emulsion has been designed to meter at ASA 25 under early spring northward lighting at moderate latitudes, but expect actual speed to vary by up to a stop or more. Ortho response can be achieved with a Yellow 2 filter and 3 stop compensation, as a starting point. Test and bracket accordingly. OPEN BOX ONLY UNDER DIM RED SAFELIGHT! The unexposed plates can be loaded under any darkroom safelight suitable for high-speed orthochromatic film. Working time is ~ 3 minutes at a minimum distance of 4 feet from a 5W bulb behind a Kodak 1A filter or equivalent |

|
Plate sizing information
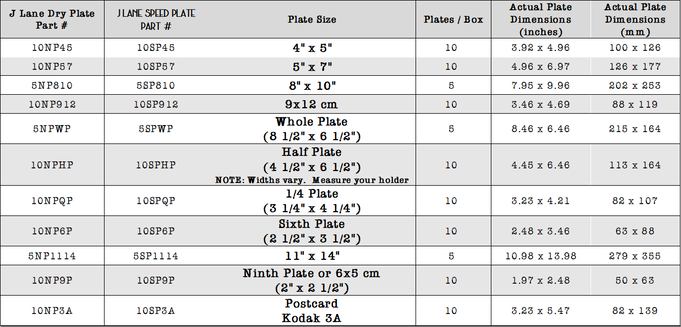
Table of Stock Dry Plate offersings, showing part #, format, and true as-cut dimensions.
J. Lane Dry Plates and Speed Plates are 1.3mm thick
Stock Plate Sizes
Photographic negatives came in a vast array of sizes in the late 19th Century. Small, large, wide and narrow, any and all sizes could be found to support the almost exclusive use of contact printing to make positive photographs from wallet size to wall size. Like today, photographic prints were made in all sizes, but unlike today, the negatives were typically the same size as well. Those of us familiar with the large format photography world know that the dizzying array of cameras and equipment unique to those formats can also be found today. This creates a challenge in achieving my goal of resurrecting the dry plate process: I want to ensure that dry plates in all the various sizes are as readily available as the most common formats.
To add to the puzzle, many customers have adopted the use of newly-made wet plate holders to try out the dry plates. In most cases, newly manufactured wet plate holders are fabricated to support plates the same size as sheet film. The challenge is that, for a given format, sheet film has always been undersized compared to its glass plate counterpart. This stems from the early decision by Kodak and other film makers to make sheet film adapter sleeves which would allow the dry plate photographer to shoot film with their existing dry plate equipment. The film was loaded in the sleeve, which was then loaded in the dry plate holder. The sleeves were made the same size as the glass plates, and naturally the film was cut smaller to slide easily into the sleeve.
To meet this challenge for the needs of the modern photographer, my glass plates are cut, when possible, to dimensions that will accommodate both antique dry plate holders *and* the wet plate holders that companies are making today. The sizing is a trade-off in the physical dimensions of the glass: Small enough to fit new wet plate holders but large enough not to fall out of antique dry plate holders.
I take every opportunity to test the fit of the glass plates in both new and old holders. As part of the continuing improvement process I have adopted from my engineering background, I will tweak the dimensions of my plates as the need arises, but for the most part . I am also helped by the International Standards Organization - ISO - standard sheet film sizes, which have been voluntarily adopted by most of the world's manufacturers of sheet film. The governing standard, ISO 1012, describes sheet film dimensions. I ensure that my glass plates also meet this standard.
Custom Plate Sizes
The selection of "stock" sizes support the most commonly encountered dry plate and large format cameras. Understanding that the dry plate era was a period of transition, you may have a camera which requires plates in a size you either don't find listed. If so, please inquire and I will work with you to provide plates that fit your camera.
Plate Thickness
Dry plate thickness is indicated on the back of the box. For plates with long dimension 12" or less, plate thickness is nominally 1.3mm (0.050"). This thickness was selected to replicate what I measured of historical dry plates.
For plates with a side longer than 12", plate thickness is nominally 2.3mm, or 0.092" (3/32").
Ultra Large Format
Ultra Large Format Photography is a passionate pursuit and a unique photography experience in its own right. At sizes larger than 8x10, a properly exposed and developed ultra large format dry plate is a wonderful thing to behold indeed.
I've coated and supplied plates up to 16 x 20, and can coat even larger as needed. If you are interested in larger formats than 8x10, just ask. ULF dry plates can be coated with either emulsion. When the plate dimensions exceed 12", I use 3/32" thick sheet glass for safer handling. Pricing is typically per-plate. If, when you request and order for ULF plates, you haven't yet had experience shooting our dry plates, we provide a smaller format plate (usually 8x10 or 4x5) coated with the same emulsion. This allows you to test your setup, metering, exposure, and develop so you don't have to sacrifice the first ULF plate. This saves you time and cost. Inquire about ULF dry plates using the Contact page.
Shipping of Plates
If you worry about shipping plates large or small, don't! I am an optical engineer by profession and have many years of experience packing incredibly expensive, fragile optics for shipment. I will give your plates the same careful treatment, because I know just how important your investment is to you.
In the hundreds of shipments I've sent out through the mail, only one package has arrived damaged (the box looked like it had been run over by a truck). Postal insurance covered the plates, and the customer received replacement plates with no issues at no additional cost. In the unlikely event that your plates are damaged in shipment, please let me know ASAP and I will work to resolve the problem.
TIPS FOR SHOOTING DRY PLATES
Successfully shooting dry plates isn't difficult, but it isn't easy either when you are first getting started. Metering requires a slightly different mindset due to the different response to the visible spectrum. While dry plate negatives share many characteristics of both modern film negatives and wet plates, the uniqueness of coating silver gelatin emulsion onto glass in similar fashion to that of the 1880s requires extra care and discipline in the darkroom. Don't let this alarm you, however. What I've found is that the extra care taken for working with dry plates actually provides you benefits for your other photography as well. For example, dry plates need a consistent temperatures to avoid problems with the emulsion during processing. Side benefit: Get into the practice of more precisely controlling your temperatures in the darkroom and you'll find -- like I did -- that the quality and consistency of your film and prints improve.
The saying goes that you learn more from mistakes than from successes. By that measure I should be a flipping genius with dry plates. Over the years that I have been shooting dry plate (and film!), I have made pretty much every conceivable mistake possible. Underexposed, overexposed, emulsion dissolving in developer, in fixer, in the stop, and in the wash. Emulsion with beautiful pictures floating away. Emulsion flaking away. Emulsion fading after development. Used the fixer first ... the list goes on and on. If there is a way to mess up plates (and film!), I can pretty much guarantee you I've done it before.
The irony is ... when searching for answers I found that people were making the same mistakes 120+ years ago, and talked about the same concerns and issues that we talk about today! Dry plate photography certainly did open up the hobby to amateurs, and definitely benefited from the user-established amateur and professional technical journals, clubs, and periodicals which were a very popular method of conveying information in the late 19th and early 20th Century. Weekly periodicals were the 19th Century version of the internet, and the articles read much the same as modern day blogs and forums...something I find to be fascinating. Like today, the photography community was very enthusiastic about sharing lessons and new discoveries. The benefit is that, hopefully, you can take advantage of this wealth of knowledge and the mistakes I've made to avoid making your own. My goal is to get you up the technical learning curve quickly so that you can really start to explore the creative aspect as soon as possible.
Without further ado, here are tips and suggestions that will help you be a successful dry plate photographer!
HANDLING OF DRY PLATES
The substrate of the dry plate is glass, so exercise the same caution as you would handling any other piece of sheet glass. That said, the sharp edges of the cut glass are “swiped” or lightly beveled during manufacture to reduce the chance of causing cuts and injury. This allows you to more safely hold the plates by the edges without having to touch the emulsion (the edge treatment also aids emulsion adhesion).
WORKING WITH PLATES UNDER THE SAFELIGHT
J Lane Dry Plates can be handled without fogging under safelights suitable for handling photographic paper. In fact, up until recently I used a Kodak 0C filter for coating work, only switching to a 1A filter when I started testing faster orthochromatic emulsions. This allows you to open the box and load plates under your normal working conditions in your darkroom. When in doubt, perform a fog test similar to how you’d test for fogging of photographic paper.
METERING OUTDOORS - VARIATIONS IN EFFECTIVE SPEED
If you dig through enough literature from the dry plate era, you will eventually come across references to exposure tables, which provided compensating factors to adjust for correct exposure over the course of the year and time of day. It wasn't until well into the 20th Century that the effective speed became independent from the amount of UV available...either by advances in dye sensitization or adding UV filtering dyes to the overcoating layer of the emulsion.
So to obtain a properly exposed plate, you will want to compensate for time of year / time of day just like they did in the 19th Century.
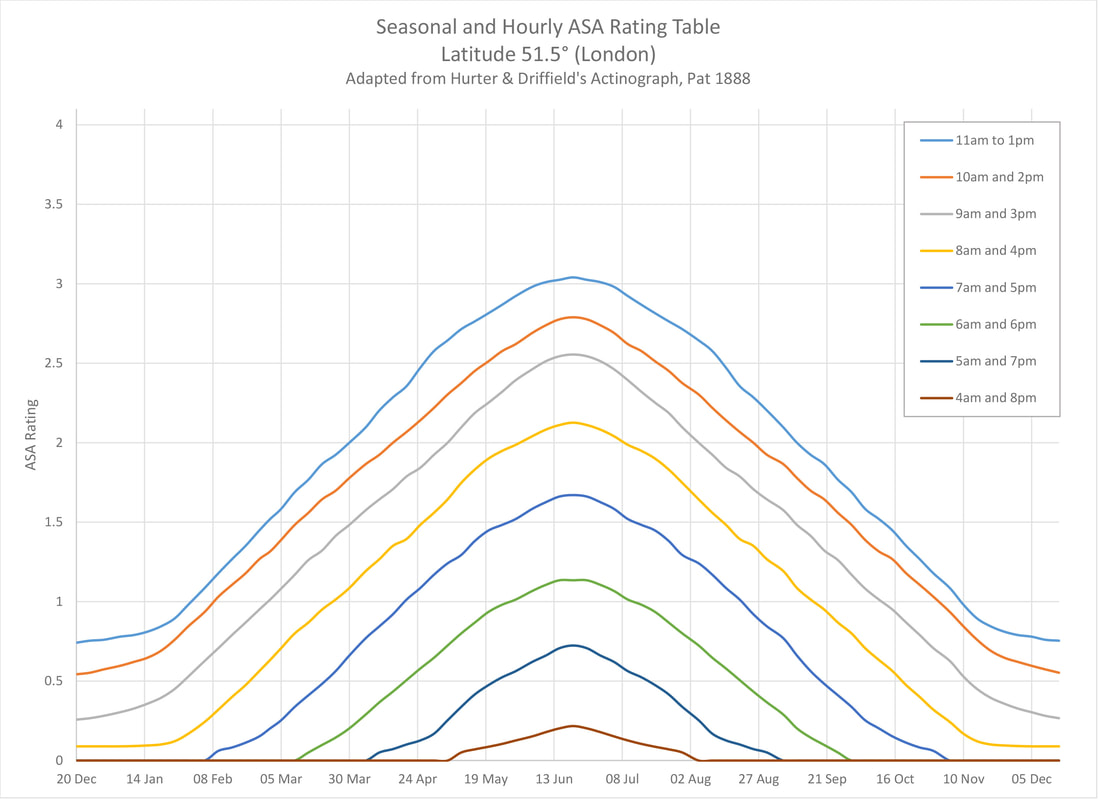
In practice, J. Lane Dry Plates meter at approximately ASA 2. The plates see primarily in the UV, so this metering is dependent on the available UV levels. In general the UV levels can vary significantly over the course of the year, so the effective speed that you meter at should be adjusted. The ASA 2 rating was established under clear northerly lighting in March at my latitude (42 North), so in summer you will achieve a faster effective speed and in winter you must expose at a slower effective speed.
Pictured below is a seasonal and hourly ASA rating table, based on data from an H&D 1880's era Actinograph. This gives an indication of what ASA value you should set your meter to based on time of year and time of day at 51.5 degrees North (or South).
The saying goes that you learn more from mistakes than from successes. By that measure I should be a flipping genius with dry plates. Over the years that I have been shooting dry plate (and film!), I have made pretty much every conceivable mistake possible. Underexposed, overexposed, emulsion dissolving in developer, in fixer, in the stop, and in the wash. Emulsion with beautiful pictures floating away. Emulsion flaking away. Emulsion fading after development. Used the fixer first ... the list goes on and on. If there is a way to mess up plates (and film!), I can pretty much guarantee you I've done it before.
The irony is ... when searching for answers I found that people were making the same mistakes 120+ years ago, and talked about the same concerns and issues that we talk about today! Dry plate photography certainly did open up the hobby to amateurs, and definitely benefited from the user-established amateur and professional technical journals, clubs, and periodicals which were a very popular method of conveying information in the late 19th and early 20th Century. Weekly periodicals were the 19th Century version of the internet, and the articles read much the same as modern day blogs and forums...something I find to be fascinating. Like today, the photography community was very enthusiastic about sharing lessons and new discoveries. The benefit is that, hopefully, you can take advantage of this wealth of knowledge and the mistakes I've made to avoid making your own. My goal is to get you up the technical learning curve quickly so that you can really start to explore the creative aspect as soon as possible.
Without further ado, here are tips and suggestions that will help you be a successful dry plate photographer!
HANDLING OF DRY PLATES
The substrate of the dry plate is glass, so exercise the same caution as you would handling any other piece of sheet glass. That said, the sharp edges of the cut glass are “swiped” or lightly beveled during manufacture to reduce the chance of causing cuts and injury. This allows you to more safely hold the plates by the edges without having to touch the emulsion (the edge treatment also aids emulsion adhesion).
WORKING WITH PLATES UNDER THE SAFELIGHT
J Lane Dry Plates can be handled without fogging under safelights suitable for handling photographic paper. In fact, up until recently I used a Kodak 0C filter for coating work, only switching to a 1A filter when I started testing faster orthochromatic emulsions. This allows you to open the box and load plates under your normal working conditions in your darkroom. When in doubt, perform a fog test similar to how you’d test for fogging of photographic paper.
METERING OUTDOORS - VARIATIONS IN EFFECTIVE SPEED
If you dig through enough literature from the dry plate era, you will eventually come across references to exposure tables, which provided compensating factors to adjust for correct exposure over the course of the year and time of day. It wasn't until well into the 20th Century that the effective speed became independent from the amount of UV available...either by advances in dye sensitization or adding UV filtering dyes to the overcoating layer of the emulsion.
So to obtain a properly exposed plate, you will want to compensate for time of year / time of day just like they did in the 19th Century.
In practice, J. Lane Dry Plates meter at approximately ASA 2. The plates see primarily in the UV, so this metering is dependent on the available UV levels. In general the UV levels can vary significantly over the course of the year, so the effective speed that you meter at should be adjusted. The ASA 2 rating was established under clear northerly lighting in March at my latitude (42 North), so in summer you will achieve a faster effective speed and in winter you must expose at a slower effective speed.
Pictured below is a seasonal and hourly ASA rating table, based on data from an H&D 1880's era Actinograph. This gives an indication of what ASA value you should set your meter to based on time of year and time of day at 51.5 degrees North (or South).
Meter primarily off of your main subject of interest. On a perfectly exposed dry plate photograph, the sky will be overexposed and vegetation will look dark. This is again due to the way the world looks in the UV and blue as "seen" by the plates. When you meter for your shot, be aware of how much of the sky or vegetation your meter is registering and compensate accordingly. Plan to overexpose a clear sky by about 2 stops... an overcast sky by about 1 stop.
This is based on my practical experience with the type of photography that I do. I use the Light Meter app on my smartphone, which is sort of a spot meter and works well for my needs. Keep in mind the color response of the emulsion, and which colors will be rendered brighter and darker.
You can also try placing a blue filter in front of your meter, which will more closely mimic the response of the emulsion.
METERING INDOORS
Changes in effective speed under artificial lighting is an effect that even modern film experiences today. During the dry plate era, artificial lighting had an even more pronounced effect.
STROBE:
Set flash meter for ASA rating of the dry plates and add +2 1/2 stops exposure compensation. This corrects reading for plate effective speed due to significantly reduced UV output of strobes.
Recommend 1800 W-s at a minimum. 2400 W-s allows the strobes to be positioned a more reasonable distance from the subject. I tend to use a long shutter setting (1s) to add some exposure from the modeling lights.
Single-use FLASH BULBS
One exception which should be no surprise: Traditional single-use flash bulbs allow you to shoot indoors at full speed. You do need to extrapolate to the ASA rating of the plates to determine the correct guide number. If you haven't tried flashbulbs, I recommend using this as an excuse to try them out. They are a lot of fun! There are plenty on auction sites such as eBay at low cost. Just take note of the bulb type and acquire a suitable flash gun as well.
AMBIENT ARTIFICIAL LIGHTING (Incandescent, LED, Fluorescent)
Either one of the following methods can be used.
- Meter at box speed and add 3 stops exposure.
- Hold or position a Blue 47B filter in front of your light meter's sensor. Set your meter at box speed + 2 stops (i.e. ASA 8 for J Lane Dry Plates and ASA 100 for J Lane Speed Plates). Use the indicated meter reading for an exposure time. The Blue 47B filter will *roughly* calibrate the sensor's spectral response to mimic that of the dry plate, and adding two stops to the ASA setting is essentially adding the "filter factor" so that you can meter directly.
RECIPROCITY
For J Lane Dry Plates, add 50% exposure time above 45 seconds, and double exposure time above 2 minutes
For J Lane Speed Plates, add 50% exposure time above 4 seconds, and double exposure time above 10 seconds.
DEVELOPING
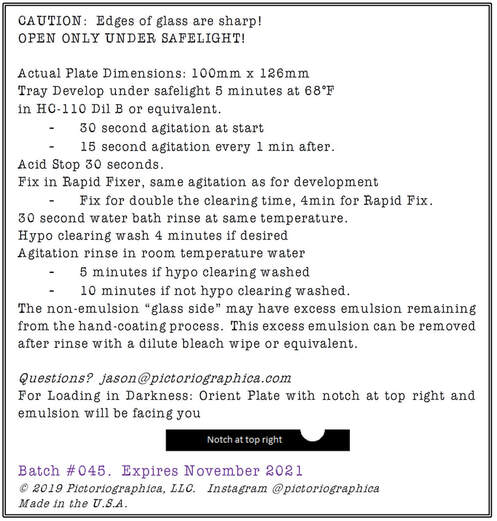
The image shown here is a screen capture of the developing recommendations I print on every box label. If you are first starting out working with dry plates, following these recommendations will result in a successfully developed plate. As you gain experience with the plates, developing by inspection becomes a powerful tool to compensate for the effective plate speed which varies over the year and during the day. The recommendations will help you avoid most of the pitfalls that I (and most other dry plate beginners) have experienced.
While I recommend Kodak HC-110 -- a very robust general purpose liquid developer -- many other developers will result in beautiful plates. If you have a favorite developer, feel free to develop by inspection under the safelight. Develop until you see details in the shadows.
I test other developers as I have time. The following developers have given very good results
- Kodak D-76 Stock, 9 minutes tray development
- Microdol-X, 10 minutes
- Dektol Stock, 5 minutes
- PolymaxT, 6 minutes
- DK-50, 2-3 minutes and be ready to pull it and into an acid stop bath fast!
The plates in general seem to respond well to active developers, fine-grain developers, and solvent developers.
The plates do not seem to respond well to acutance developers such as Rodinal. While they can work, the result seems to accentuate undesirable flaws and issues which are inherent to hand-coating with primitive emulsions.
Early in production of J Lane Dry Plates (early 2018), I recommended use of hardening fixer to avoid issues with frilling and lifting. Since then, I've incorporated the same formulas that the early pioneers used to harden their emulsions. The emulsion is now much more resilient to warmer developing temperatures and adhesion to the glass is very good. I still recommend maintaining consistent temperatures (as done for modern film) to avoid reticulation. When wet, the emulsion is still fragile compared to modern film, so handle the plates by the edges or glass side when possible and particularly when the emulsion is wet. Make sure you know which side is the emulsion side.
During rinsing, any residual emulsion on the glass side can be wiped away with a paper towel. After it has dried, a cleaning wipe (Clorox wipe or similar) can be used to clean off the dried emulsion. A by-product of the hand-coating process, small amounts of emulsion sometimes gets onto the back of the plate during coating. We could clean it off, but we leave it be. There it remains ... a tell-tale sign of the hand-coating process, same as you would find on hand-coated dry plates manufactured in the 1880s.
Set the plate vertically and allow the plates to dry completely. It typically takes a few hours to dry. Plate drying racks are ideal for this.
Impatient to know if its ready to handle? Primitive gelatins swell significantly (compared to modern film), and you can take advantage of this. Inspecting the surface by viewing the reflection of a light bulb at glancing angle will quickly reveal dried vs. wet emulsion. I encourage you to do this about 20-30 minutes after your first plate has begun to dry... the difference between wet and dry emulsion is very obvious and you will quickly learn to recognize it.
How Long Do They Last?
This is a question I am often asked. Each box of plates has an expiration date two years out from the month of coating. This is the length of time that I carried a bunch of dry plates around in the cab of my truck before using them. The tested plates were as good as the day they were made -- no fogging or loss of speed. I am sure they will last much longer -- just like any other extremely fine-grained black and white emulsion -- but I only tested out two years.
Updated by JRL, 6 November 2021